Thursday, August 30, 2012

Saying Goodbye to Summer


Wishing all of you a happy holiday weekend, as we say goodbye to summer.


Penny


- Posted using BlogPress from my iPad

It Started with a Green Bowl

 
It did all start with seeing a photo of a table setting with a green glass bowl.  A couple of posts back, I shared the photo and technique for coloring clear glass.  While cooking dinner one evening, I decided to make a tablescape, using some of the elements from the inspiration table and some of my own ideas.

I didn't have daisies, or a large white pitcher.  What I did have were 2 just picked zucchinis, some oak leaves I picked up on our walk, and some burr oak acorns I found on the ground at a friend's home.

 I had never seen these acorns before.  I had to look up "fuzzy acorns" to find that they come from the burr oak.  I had my dearest helping me pick them up in the rain on Sunday.  The things he does for love!

I put one of my white footed bowls on a vintage cutting board.  Filled the bowl with moss, oak leaves and the acorns.  The zucchini matched my palette, plus gave the table the look of late summer... On the brink of Autumn look  I was going for.

Kristen's friend Lizz gave me these little salt and pepper shakers a few years back.  They are so tempting for little hands, but have managed to survive to decorate my table.

I pulled out all the stops and the fine ;-) wine glasses.  They are the kind you get in a box of 12 for $10, at least back when I bought them, at the Linens and Such...

All because of a little green bowl.  I appreciate all who commented on the painting glass post.  It seems the simple things draw the most attention.  Thanks my friends. Enjoy this beautiful day!

Wednesday, August 29, 2012

Granny Square Button Cuff


Wednesday already...  The official last week of summer, but I am so ready for some cooler temps.  I found this oh so cute pattern at The Felted Button.  As fast as I could get a crochet hook, I started on this cozy cuff. 
 Little granny square motifs, slip stitched together to make a cuff.

Working in a tiny scale is tough since I'm so used to larger items.  I also don't usually care for things that are fussy, needing lots of end hiding and color changing.  Since this is such a small project the advantage and attraction for me is almost instant gratification! It's also different, cute and boy do I have yarn.

There was also this oh so handy tip, well actually a photo of many small bits of yarn wound on clothespins.
Everyone who crochets or knits ends up with tiny bits like this.  The handy way the clothespin can hold the end of the yarn is genius.  Imagine a jar filled with different colored yarn scraps like this...right up my alley!

 Once I got the hang of it, I made this ecru button cuff. 

 I sewed mother of pearl buttons to the centers of the lil granny.


Fast and fun!  I have not returned to the sewing machine, but have been distracted and in a weird mood.  I've seen other bloggers in this same state of mind.  I can't complain, I've been getting things done...  Just not the things I recently started.  I'm looking forward to a long holiday weekend...and a better attitude.  Take care my friends.

Tuesday, August 28, 2012

Making Colored Glass With Mod Podge

 
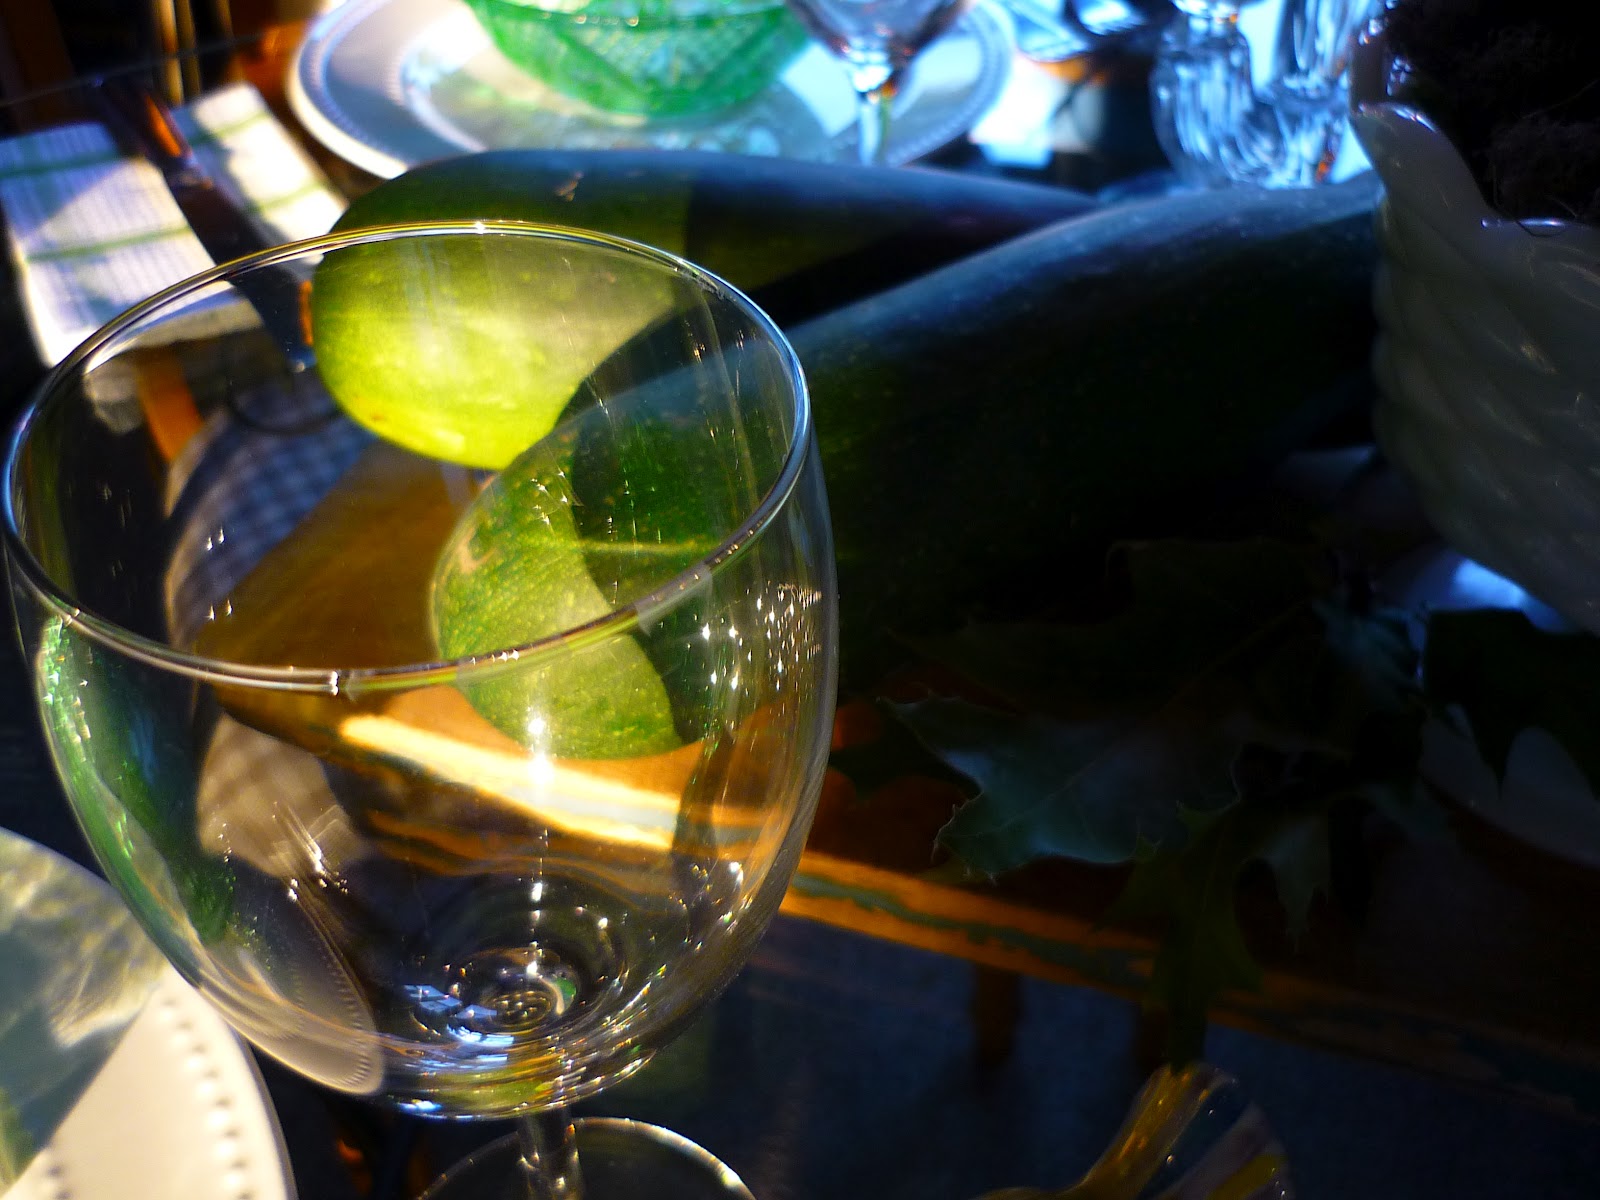
No self respecting crafter would be without Mod Podge, a staple in my craft arsenal.  I saw this technique in one of the Somerset publications.  It is used to make clear glass colored.  In the magazine they use it to color clear glass the beautiful turquoise blue of a blue canning jar.  I just had to try.

 
All you need to do is add several drops of food color to a small amount of Mod Podge.  I used a small canning jar as my mixing bowl.  I wanted to take these clear dollar store bowls and make them look like antique green glass.  I painted on a thin coat on the outside of the bowl with a regular paint brush.  I made sure there were no drips, and let it air dry.

 
I was amazed by how great they looked when completely dry.

 
Since it is a water based product, you cannot wash
 these bowls in the tradition way. 
They would have to be hand washed quickly and dried immediately. 
The article I read said that if you don't like the results,
you can soak the item in warm soapy water
 and the color will peel off. 
 I saw a similar bowl paired with a
simple white plate and accessories, it was lovely.
 (I was not able to find a link to this photo,
except that it came from brabournefarm.blogspot.) 
The inside is just still the clear glass
you could serve salad in them safely,
just with the quick wash precaution.
  

I captured this photo from brabourrnefarm.blogspot.com
 For display on the other hand, the uses are endless.  How about some orange glass for the fall?  The only limit is your imagination and the colors you can mix with the food coloring.  If you color Easter eggs this way, you know the combinations and formulas are right on the box.  It was a fun little project.

Now, back to some sewing I started last week.  Have a great day my friends.


Posted by Picasa

Monday, August 27, 2012

Inspired by Country Living


Hi everyone.  Hope you had a great weekend.  We had a little bit of everything, sun, rain, hot and a bit of a chill.  Stuck inside through the rain, I started a craft project.  One I saw here.
 
The first order of business was asking for my honey's help removing the rim on this old basket.  I use this old basket for storage in the craft room.  My DH asked why I didn't empty the basket out before I started to remove the rim...Like, WHY?...  He always chooses the hard way. ;-)  Anywho, it was a heck of a job.  Who knows how long those staples held this basket together, but they weren't going peacefully.
Thanks babe!

 
Next I needed a base.  I made this tabletop when we moved into this house 18 years ago.  The Ballard Design influence was already taking hold way back then. I stapled the chicken wire around the clockface/tabletop, to make the sides of the basket.
 I wrapped the wire under the basket and stapled to secure it.

 
Then a quick trip to Ace Hardware for a few yardsticks for the side supports. (I was going anyway for a furnace filter...)  I just wired them in place, and nailed them at the bottom to the base.

 
Then I wrapped the rim of the old basket around the top, inside and out.  I used the thick tacky glue to hold it all together and then put clothespins all the way around to hold it all together while it dried.


The final touch was spraying the yardsticks with walnut ink to match the rim.  I would like to make a handle for the basket like on the photo, but mine is alot bigger, about 20 inches across. Son Jon suggested trying to bend another yardstick for the handle, but that is beyond my woodworking skills.

So there it is, my take on the Country Living basket.  What will it hold, you might ask...  Pillows, pumpkins, my DH almost flipped when I said pine cones.  Some of you know about my proclivity to pine cones. ;-)

I wonder what this week will hold?  All good things I hope, for you and me!  Have a great day my friends.

Posted by Picasa

Friday, August 24, 2012

Amish Birds

 
Hi Friends, That's what I'm calling this WIP, Amish Birds.  I bought these bird panels long
before I was blogging at an Amish store in Indiana.
They had a remarkable selection of quilting fabric, along with canning jars, rubber hose, cooking pots, hardware...a store you could really get lost in.  I spent more money on fabric in that store than I ever have at one time.   There was a beautiful quilt on display incorporating these blocks.
I thought one day I'd make a fantastic quilt using them...but the reality is, it's not gonna happen in this lifetime.

 
The fabric is called Holiday Chorus by Nancy Davis Murty for Andover Fabrics.

 
It's holiday, but it doesn't scream Christmas.
I'd say it will be good to display from fall through winter.
I'm going to make yet another raw edge throw.

 
Working out the layout on the guest room bed.  The late afternoon sun looked so pretty
highlighting this row of birds.

 
This is the fabric I'm using for the top.  One of my yard sale finds.  I think it's a much better thing to have a throw for my family to enjoy today, than a someday piece of fabric resting in a drawer.  ;-)

Taking the weekend off from crafting...besides it's 90 degrees again today.  I need to get OUT!  Have a great weekend my friends.  Thank you so much for visiting and especially for your friendship.


 P.S. All of my New Yorkers are safe, thank God. 
Posted by Picasa

Thursday, August 23, 2012

Drop Cloth Hand Towels

 
I made these cute towels, with a boarder print and drop cloth fabric.

 
I shopped my own stash for some Autumn inspiration.
I bought this boarder print in 08,
I know because it still had the tag pinned to it. 

 
I used the same technique that I've used on the small quilts. 
Sewing down the boarder with it's raw edges exposed.

 
I also left the ends of the towel unfinished,
except for a line of stitching to keep the fraying in check.

 
Then I threw them in with a load of wash and they frayed beautifully.
The colors are a better match in person. 

Most of my time was spent going through my stash.  I found panels, yardage, flannel and fleece.  The nice part is that I have things organized, and found all the Autumn together.  I found a set of bird panels that will make a cozy throw, so that's what I am working on now.

What's with this burst of creativity?...In a word...Nesting.  This is my time of year. 

Today our sweet p. is three months old!  Happy Birthday Penny, Grandma loves you so!

Enjoy this beautiful day.

Posted by Picasa

Wednesday, August 22, 2012

Nap Quilt for Malachi

 
A little guy's first birthday is happening this week.  So I got out some cheerful prints, dogs, trucks and sponge bob...sponge bob is for Malachi's grandma, my dear friend Carmella.  Let's just say that sponge bob makes this little quilt have special meaning for Grandma.
 
It's the same easy quilt I recently made for my sweet p.  Just tack on the squares with a glue stick.
Then you make the sandwich of backing, batting and top and sew through all three.

 
Gotta love these colorful dogs.

 
Everybody loves trucks.

 
After you sew it all together and bind it, you throw it in the washer.  It gets wrinkly, the squares fray and it's perfect for a little guy on the go. The squares are scraps from other pillowcase projects, the top and back fabrics came from rummage sales.  I sure hope that Malachi likes it, I know Grandma Carmella will!

Thanks for stopping by.  Have a great day...
 

Posted by Picasa